
This 4-Minute Lightroom HACK will Transform Your Photo-Editing Workflow (VIDEO)
We’ve featured effective White Balance tutorials in the past, but the lesson below from the Camera Focus YouTube channel is about as simple as it gets. It works really well and deserves a prominent spot in your image-editing bag of tricks.
Instructor Terry Cooper is a professional landscape photographer known for using color and composition to create attention-grabbing images. In this episode he reveals his favorite Lightroom hack that delivers impressive enhancements in no time.
Cooper puts it like this: “By adjusting the White Balance in your photos you can achieve stunning results that will transform photos into works of art and take your photography to the next level.” The idea is to accurately portray colors as they appeared through the viewfinder, but you can also use Copper’s trick to create interesting special effects.
Cooper quickly explains how White Balance works and uses an environmental portrait to walk you through the easy steps in barely four minutes. As you’ll see, the same photo can convey a variety of moods and different looks depending upon the adjustments you make. He also explains why shooting in Raw will deliver the best possible results.
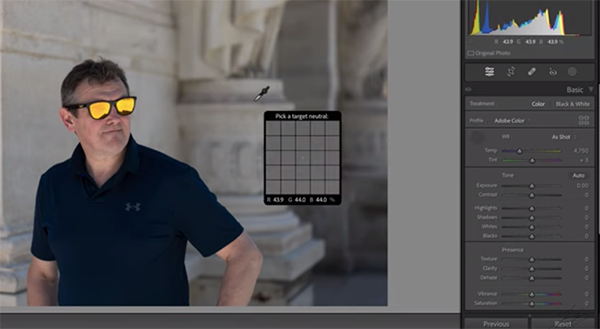
This particular image was shot using the camera’s Auto White Balance setting. Cooper opens Lightroom’s color panel and illustrates the various White Balance options available. These range from Auto, Daylight, Cloudy, and Tungsten, to Florescent, Flash, and Custom. By clicking on each of these settings you will immediately see the effects they provide.
Cooper then places Lightroom’s Color Picker over a middle-gray area in the image as a point of reference for moving forward. He also illustrates how a simple 18% gray card can be extremely helpful for achieving more accurate tones in the camera while shooting in the field. Then when you bring that image into Lightroom the adjustments are even easier.

Cooper explaining that there’s really is no such thing as “perfect White Balance” because photography is a creative and interpretive endeavor. He then demonstrates how to use Lightroom sliders to convey exactly the look you’re after. He also explains how to make “micro adjustments” to further refine your efforts.
Copper opens the Curves panel to illustrate a final trick for adjusting color range and adding a bit of contrast to the shot. Bottom line: It’s quick, easy and effective. There are more straightforward tips and tricks on Cooper’s instructional YouTube channel, so be sure to pay a visit and explore what he has to offer.
We also suggest watching the tutorial we posted earlier, with what another image-editing expert says is, “the best simple Lightroom Histogram trick you don’t know.”


