
Want Nature Photos with More Drama? Use Lightroom to Shape the Light (VIDEO)
Let’s say you’re out in the field with the right gear and good weather, and you come upon a great landscape scene that can’t be ignored. So you pop off a few shots, and you’re eager to review the results on your computer.
So far, so good, until you take a close look, and sadly the images look flat and uninspiring. At this point you have three choices: You can return another day to try again if you live nearby, trash the photos and chalk it up to human error, or pull up Lightroom and transform your boring images into something special.
As you may expect, today’s tutorial from the PHLOG PHOTOGRAPHY YouTube channel is all about the latter, with several great tips for rehabilitating flat photos by “shaping the light.” In barely 11 minutes you’ll learn a straightforward technique for adding drama and dimension to images that don’t quite make the grade.
Instructor Christian Mohrle is a notable German landscape photographer, and as always, you can download his demonstration image with the link beneath the video, so you can make the changes yourself as they’re explained.
The exposure of this nice mountain photo isn’t too bad, with plenty of details throughout the frame. Yet Mohrle’s experience tells him the image could be much better, partly because the shadows are too bright and some of the highlights are blown out.
The edit begins with a few basic global adjustments to prepare the photo for selective enhancements that follow. Changing the profile from Adobe Color to Adobe Landscape immediately increases base saturation. He then drops exposure to bring out more detail in the highlights and darken the shadows.
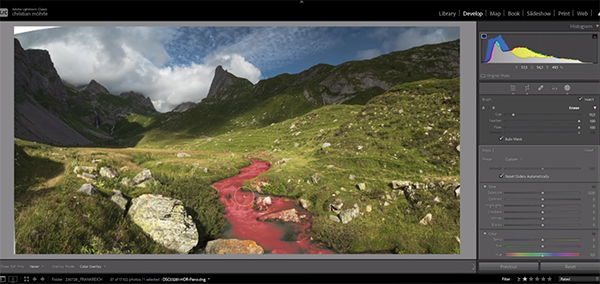
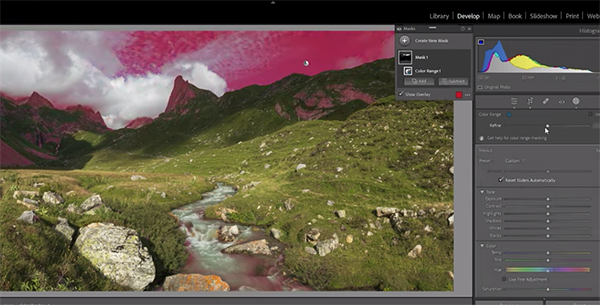
Additional adjustments boost contrast, vibrance, and texture. Now the image looks much better and it’s time for some simple masking to shape the light by selectively targeting highlights and shadows. Mohrle employs a Color Range Mask to improve tones in the sky. He uses another mask to accentuate highlights in the green tones of the foreground.
Mohrle further improves the foreground by modifying the tint for a Golden Hour effect. He then adds another Color Range Mask to enhance the small stream running up the middle of the frame. He completes the masking with a Linear Gradient over the mountains in the distance.
All that’s left to finish up the job is some additional color grading and a bit of sharpening. Compare his before/after images and we think you’ll be impressed. You can find more helpful lessons like this by visiting Mohrle’s popular YouTube channel.
And don’t miss the tutorial we posted earlier, with a simple and effective way to use Lightroom’s HSL sliders for better nature photos, portraits, and more.


